As the June Monthly Muse for the Gingersnap Creations blog I’ve been asked to do a couple of tutorials and as you know I love sharing how I make things with you guys. So here is my first Gingersnap Creations tutorial for you and you might need to get yourself comfy as it is a long one! Those of you that visit the Gingersnap Creations blog regularly will have seen
this on Monday.
I just can’t throw anything away, nope not a thing – bet you are like that too? I keep things for that ‘just in case’ moment and I had one of those ‘just in case’ moments recently that ended up
like this:
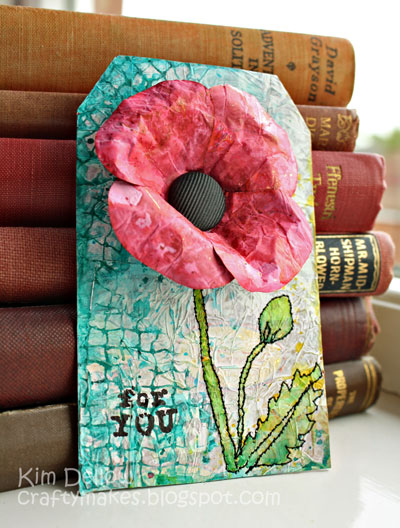
Would you believe that this is all made from sweetie wrappers? Would you like to make one too? I know you have those shiny wrappers hidden somewhere…if you don’t then what better reason to go get some and discard the contents in some way…?
I knew this lot would come in handy!
What you will need:
Stamps – The Stamp Man Aspect Of Design 1 Floral; {Ippity} Totally Happy
Colouring – ZIG Writer pens; ZIG Calligraphy Pens
Papers – Sweet Wrappers; Card
Usual Suspects – Golden Soft Gel (Matte); Golden Heavy Gel (Matte); Gesso
Equipment – Sewing Machine; Heat tool; Cocktail stick; Scissors
Other – Sandpaper; Thread; Spray bottle of water; Big fabric brad; ZIG water colour system BrusH2O
Prepare The Sweetie Wrappers
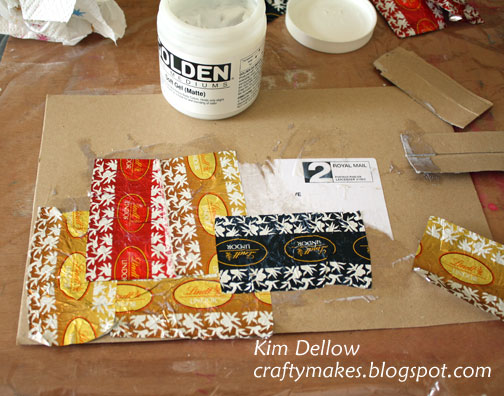
Trim the wrappers, I just wanted the colour parts with the metal backing as this part of the wrapper is manageable and retains it shape when manipulated. Then lightly sand both sides of the wrappers.
Stick Wrappers To The Card Background
Use a piece of card as backing (look more package recycling!) start sticking the wrappers in a random order, I used Golden Gel medium and ‘squidged’ some of the wrappers a bit to get a good texture going. Allow it to dry.
It’s Gesso Time!
It is out with the Gesso, a coat or two should do the trick. I wanted to be able to see the wrappers but I also wanted to add my own colour on top.
You can see the effect of the ‘squidging’ leading to a nice wrinkling of the background. Another nice effect is that some of the shine still pops through the Gesso layer where the sanding did not take.
Whilst you are at it Gesso a couple of spare sanded wrappers at set aside for the poppy.
Build Up The Colour
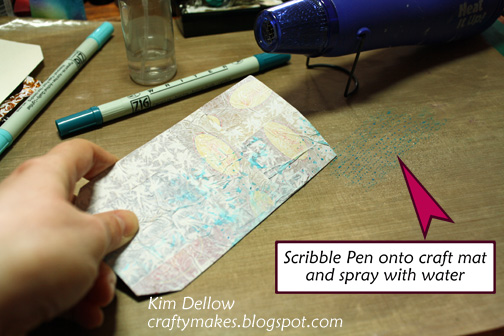
Cut out the tag and start building up the colour with the ZIG Writer and Calligraphy pens. I wanted to add more texture with the colour and one of the best way to do this is use the ‘Scribble’ technique.
Scribble the ZIG pen onto the craft mat and spray with water to form droplets of colour. Press the surface to be coloured into the droplets to pick up the colour.
I built up slowly, going from light to dark tones. You can use your heat tool between layers to dry the water but use it carefully as the wrappers are partly plastic and will deform in prolonged heat.
Add More Texture With Stamping
Stamp some more texture with the mesh stamp from the Aspects Of Design Floral stamp set. Cut out four poppy petals from your spare Gessoed wrappers and colour with
the ‘Scribble’ technique.
Stick the Petals Together
Use the Golden Heavy Gel, applied with the cocktail stick, to stick the petals into a loose poppy shape and I coloured a fabric brad black with a ZIG Writer pen for the flower centre.
Whilst the poppy is drying it is time to add the finishing touches to the background.
Add More Texture With Stitch
By adding stem and leaf details. I used my sewing machine but you can easily doodle it or hand stitch it if you prefer.
I then coloured the leaf and stem with ZIG Writer and Calligraphy pens using the ZIG water colour system BrusH2O and finished with the ‘For You’ sentiment stamp from the {Ippity} Totally Happy stamp kit.
Finish The Poppy
Finish the poppy by adding the brad and then shaping it with your hand before sticking the background with the Golden Heavy Gel.
***
Your other half/child/flatmate/pet will be so pleased you have finally found a use for those discarded wrappers stuffed in that box/draw/sock/down the side of the couch.
Gotta love us hoarders!
Have fun with this technique and do come back to tell me if you have used it so that I can come and have a nosey!
Kimx


Wow, Kim, this is gorgeous! That candy wrapper background is simply amazing, I need to try that as soon as I can (yay, now I have a good reason to go out and buy some sweets! ;D ). Love the flower, too!
Wow – love your pictures to show what you did. Card finished project, gotta love those sweetie wrappers. Good excuse to eat more chocs! Zo x
Hi Kim! Thanks for this tutorial! Hugs, Ks.
Well, it seems that I was quick 😉 I've already given your tutorial a try, please come and take a quick look! And if you feel like noseying around some more 😉 you can check out this and this – I gave a try to your collage background tutorial some time ago!
(That deleted comment above was mine, made a mistake, sorry!)
This is a very cool idea Kim! I need to give this a try!! I love your tag!!
What a great technique – thanks for showing us 'how'.
Toni :o)
What a brilliant tutorial, Kim. Aren't all crafters hoarders?
I must give this a go, what an excuse to go out and treat myself to some choccies.
It's a stunning tag, no one would ever believe what it started life as.
Thanks so much for the inspiration.
Hugs Liaax
Wow Kim, this is excellent. Not sure how I missed this over at Gingersnap, glad you had it up on your blog.
This is cool.
Lesley 🙂
love it, I made the background the same like you yesterday,m the flower is so great. beautifull!!!!! Hugs, Janine
Love the finished project – worth suffering eating the sweets for the wrappers!
Fabulous technique (and tutorial)Kim – must give that a try. Only thing is, I'll need to buy some sweeties now – I usually dispose of them in the bin ASAP to hide the evidence!!! I do hoard everything else though – LOL.
Oh this is great. Don't eat that much candy, but I will remember it when I get my hands on them
Just a question. What kinda sewingmachine do you have?
I am searching for a machine which I can freely doodle with too. But there are soooo many machines… that I can't see the trees through the forest.
So clever and gorgeous!