Welcome back to my free Love To Stitch Mini Book Tutorial series.
A couple of weeks ago I shared with you the making of the cover page of my stitching-inspired mini book altering in part 1 of my new tutorial series for Creative Expressions.

I’m back again this week to share with you the making of pages 1 and 2 in Part 2, so sit back and enjoy!

I wanted a simple double page spread to start the inside of the book.

As you can see from the front cover I’m not going for a totally vintage look with the Umount Vintage Sewing A5 Stamp Plate, so I’ve not gone overboard with the distressing,

but I have added some distressed colouring for texture and to bring the book together.
What You Will Need:
Eco-Green Crafts Board Book 4″ x 4″
Umount Vintage Sewing A5 Stamp Plate
Eco Green Acrylic Paints – Sand
Ranger Archival Ink Pad – Jet Black, Coffee, Vermillion
Large Polka Mask – can use the That Special Touch Mask
VersaMark ink pad
Distress inks – Tea Dye, Vintage Photo, Walnut Stain
Clear embossing powder
Gesso
Old book pages
Tools – Sponge, brushes, blending tool
Heat tool
Golden Soft gel
Hole punch
3D-foam
Step One – Preparing the Surface
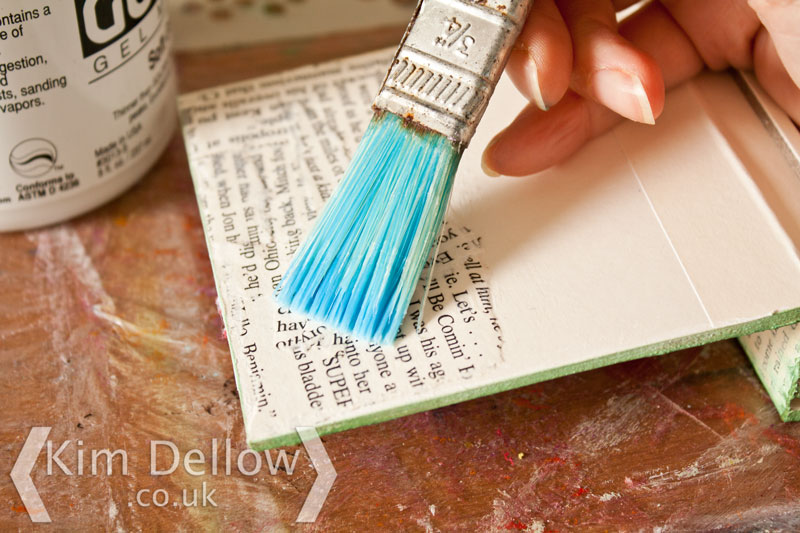
Just as I did with the front cover I’ve started these pages with an old book page collage.
Glue old book pages over a small section of the left hand side of page 1. Once the collage is dry use the large polka dot mask and some thick Gesso to add some large, raised dots. Again, let the dots dry completely then use a sponge to smear a light layer of the Sand paint over both pages.
Pop over to Part 1 of this tutorial series to see how to make the dots and paint with the sponge in more details in Steps 1-3.
Step Two – Add Texture With Some Stamping

Once the pages are dry use the Coffee Archival ink pad and the hessian stamp from the kit to layer some stamping texture on the bottom right-hand corner of page 2.
TIP – For some of the stamping you may need to hold the page open and press with one hand on the stamp and the other on the back of the page to give a firm surface for the stamping.
Step Three – Make A Mini Tag

Trim a long, thin tag shape from card and heat emboss the tape measure stamp with clear embossing powder. Use the Distress inks and the blending tool to colour the tag and rub any excess ink off of the embossing with a damp soft cloth to make sure that the embossed relief ‘pops’.
Don’t forget to colour the top section of the back of the tag as well as this will be poking out the top of the book when it is finished.
Step 4 – Add A Bit Of Balance

Use the blending tools and the Distress inks to add colour to the polka dot texture on page 1. Then rub the distress ink pads and the coffee Archival ink pad directly over the raised areas for even more texture.
TIP – This might take a long time to dry so try the heat tool gently (don’t over heat the area) and don’t shut the book until you are sure it is dry. Put a spare piece of paper between the pages if you have to close it before it is dry.
Step 5 – Finish the Tag

Wrap the Baker’s twine around the bottom of the tag and tie off. Then cut three small holes in the top of the tag with two holes next to each other and one hole above and in the middle. Now thread some Baker’s twine from back to front through the bottom two holes and then thread both ends back through the top hole and tie a knot in the end.
Step 6 – Stick It All Together

Stick the tag to page 2 with 3D-foam, stamp the sentiment with the Vermillion Archival ink and tear the edges before sticking to the tag.
Page 1 and 2 finished!
I’ll be back in a couple of weeks to share some more pages.
Thanks for popping by.
Kim

Related Articles:
Love To Stitch Mini Book Tutorial – Part 1

A great make and great tutorial xtrace.
Hello Kim! Your album is a wonder! Thanks for sharing the creation process. I'll try your technique once 😉
Love the balance, Kim! Great mini-book/thanks 🙂
I love your minibook tutorial series. It's wonderful to see how your minibook takes shape and evolves. Always lovely to learn from you 🙂 And thanks for your comment on my blog <3